I’ve seen a lot of snippets of code online where people are trying to make text clickable in Windows Phone 7, and plenty of them are using the OnMouseLeftButtonDown event to do it. Well to put this lightly, this is not the best way of handling a click in the Windows Phone 7 environment. The reason is that we have to put the “left button” down in order to scroll. The “left button” is our finger, so if we try to scroll down and press our finger on the text we will be activating the event by mistake.
In order to resolve this we need to have the click event. Well, the click event is on the Button not on the TextBlock. In this example I will be using the MVVM Light toolkit and showing how I can wire up a Click event to a command on my ViewModel.
This example is a DataTemplate being used to display a list of colors each one as a bound item in a ListBox. I will be setting the text of each item to be the name of the color and I will be handling the click event by binding it to a command on my ViewModel the command will take in the color’s ID as a parameter. Notice that since I am in a DataTemplate I have to access the ViewModel for this view by accessing my view. While in the DataTemplate my current DataContext is the Color item I am binding in the list. Read more about accessing the ViewModel from a DataTemplate.
<DataTemplate x:Key="colorListTemplate">
  <Grid>
    <Button>
      <Button.Template>
        <ControlTemplate>
          <TextBlock Text="{Binding Name}" FontSize="64" />
        </ControlTemplate>
      </Button.Template>
      <i:Interaction.Triggers>
        <i:EventTrigger EventName="Click">
          <cmd:EventToCommand
          Command="{Binding DataContext.PickColor, ElementName=TheView}"
          CommandParameter="{Binding Path=ID}"/>
        </i:EventTrigger>
      <i:Interaction.Triggers>
    </Button>
  </Grid>
</DataTemplate>
Notice that I set the ContentTemplate of the Button. This means that I am telling the control to not display how it would normally display and instead to display how I want it to. I do this so that I can display text as normal so that it looks like a have a regular list of items, and I am able to make this text handle the event when someone clicks on it. Keep in mind that a click and a scroll are two different operations in the Windows Phone, so non one is going to accidentally click on my item when they are trying to scroll. If I had done this with a MouseLeftButtonDown event as I’ve seen shown in the past it will cause the command to happen when someone is trying to scroll the list on the phone.
Remember that a button can look like anything in Silverlight. You have a ContentTemplate you can define for the button, so you have the power to always have a Click event. So if you need to make something clickable, make a button and put your control as the template for the button.
Writing good code that can be trusted to work means unit testing your code. In order to effectively maintain these tests you will need to follow the same principles you would with any other code. This of course means that you extract logic to achieve code reuse, name methods and objects clearly, use composition, and use inheritance.
In this post I am going to show how you can get some code reuse when you’re following another good testing practice. You should keep things well abstracted. I like to keep my tests in folders and I keep test classes in those folders. I do this so that I can have each test class be small and only be testing one things. By doing this I make my test classes a lot cleaner and easier to work with. This means, however, that if I do not extract some of the duplication I could be creating more maintenance work later.
On way that I keep my tests more maintainable is to keep duplicated logic for initialization in base classes. When I am testing methods of a certain class, I will keep a folder of those tests and have a class for each area of the code I want to test. This lets me keep some of the initialization logic in a base class. Many of the test classes will need an instance of the object being tested, so I can put logic in the base class to initialize my mock objects pass them to the constructor of the class I will be testing.
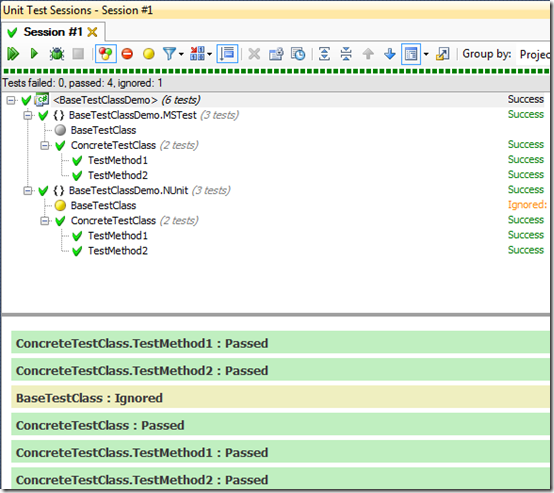
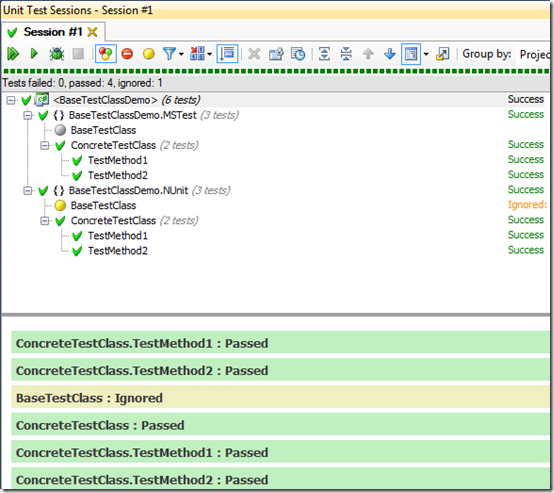
Setting up a base class is easy. The following examples show how to set up a base test class in MSTest and NUnit.
Setting Up a Base Test Class with MSTest
[TestClass]
public class BaseTestClass
{
    public BaseTestClass()
    {
        Console.WriteLine("BaseTestClass.Ctor()");
    }

    [TestInitialize]
    public void BaseTestInitialize()
    {
        Console.WriteLine("BaseTestClass.BaseTestInitialize()");
    }

    [TestCleanup]
    public void BaseTestCleanup()
    {
        Console.WriteLine("BaseTestClass.BaseTestCleanup()");
    }
}

[TestClass]
public class ConcreteTestClass :BaseTestClass
{
    public ConcreteTestClass()
    {
        Console.WriteLine("ConcreteTestClass.Ctor()");
    }

    [TestInitialize]
    public void MyTestInitialize()
    {
        Console.WriteLine("ConcreteTestClass.MyTestInitialize()");
    }

    [TestCleanup]
    public void MyTestCleanup()
    {
        Console.WriteLine("ConcreteTestClass.MyTestCleanup()");
    }


    [TestMethod]
    public void TestMethod1()
    {
        Console.WriteLine("ConcreteTestClass.TestMethod1()");
    }

    [TestMethod]
    public void TestMethod2()
    {
        Console.WriteLine("ConcreteTestClass.TestMethod2()");
    }
}


Setting Up a Base Test Class using NUnit
[TestFixture]
public class BaseTestClass
{
    public BaseTestClass()
    {
        Console.WriteLine("BaseTestClass.Ctor()");
    }

    [SetUp]
    public void BaseSetUp()
    {
        Console.WriteLine("BaseTestClass.SetUp()");
    }

    [TearDown]
    public void BaseTearDown()
    {
        Console.WriteLine("BaseTestClass.TearDown()");
    }
}

[TestFixture]
public class ConcreteTestClass : BaseTestClass
{
    public ConcreteTestClass()
    {
        Console.WriteLine("ConcreteTestClass.Ctor()");
    }

    [SetUp]
    public void SetUp()
    {
        Console.WriteLine("ConcreteTestClass.SetUp()");
    }

    [TearDown]
    public void TearDown()
    {
        Console.WriteLine("ConcreteTestClass.TearDown()");
    }


    [Test]
    public void TestMethod1()
    {
        Console.WriteLine("ConcreteTestClass.TestMethod1()");
    }

    [Test]
    public void TestMethod2()
    {
        Console.WriteLine("ConcreteTestClass.TestMethod2()");
    }
}


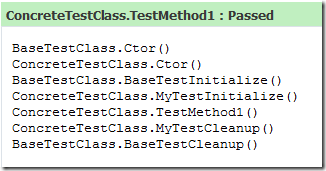
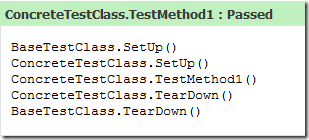
Notice in these examples how the Base method setups happen first and then the local class ones. This allows you to depend on the code happening on the base class first. Then when you tear everything down you will first clear up things in the local method and then the base class will run.
Make sure you follow this example by having different names for the base methods so they don’t collide with the local names. This lets you have them both run without one having to call the other. If the names match you will either be overriding the base or hiding it, but they will not both run.
I’ve been doing a lot of Windows Phone 7 Development, which means that I have also been doing a lot of Silverlight development, so here is a tip for accessing your ViewModel when you’re in a DataTemplate.
In Silverlight, DataTemplates are used when binding data to a control. For example if I want to list users I will define the DataTemplate, which will define the XAML that will be bound to for each of the users in the list. When I do this, the data context for the DataTemplate is my user and no longer the VM. I have a few options here, I can modify the user to have what I need, I can access some global class which has what I need or can access my ViewModel, or I could do what I prefer doing, which is just to name my View.
I give my name a view, and I can then create a binding which accesses an element by name instead of by using its current data context. To do this I can just name my View like this.
<Views:ViewBase
    ...
    x:Name="TheView"
    DataContext="{Binding BarViewModel, Source={StaticResource SL}}">
Then in my binding I can access it using the ElementName property like this. This example is wiring up a Click event using MVVM Light Toolkit’s EventToCommand.
<Custom:Interaction.Triggers>
    <Custom:EventTrigger EventName="Click">
        <Command:EventToCommand
          Command="{Binding DataContext.DoSomething, ElementName=TheView}"
          CommandParameter="{Binding}" />
    </Custom:EventTrigger>
</Custom:Interaction.Triggers>
This allows me to access the commands on my ViewModel while I am using a DataTemplate. Without doing the “ElementName=TheView”, I would not easily be able to access the command from my ViewModel. I would only be able to access the commands from the User object.
After reading the title of this post, some people might be wondering why I am advocating commenting at all, because I’ve spoken out against commenting code before. My team and I were recently reading through some code that was littered with comments, and I do mean littered. There were tons, they were mostly useless statements like “//run”, and I swear there were more of them than actual code. This of course sparked some preaching to our choir about how comments in code are often less-than-useful. We of course settled on the time when they are useful being the XML comments on methods, but those should also only be used when writing public libraries where others will not have access to the source code or unit tests.
Comments on those methods are useful since tons of people will use the method and will not be able to see the guts of the method or examples of how to use it. This makes the comments useful. However, they need to be kept up-to-date (difficult task).
So what does all of this have to do with Listkov Substitution? Well, the principle basically says that all of the classes which implement an interface (or inherit) need to work the same way. There should be no difference between implementations as far as the calling code is concerned. In fact it is really about making sure that we maintain a consistent abstraction. If we say something about the interface it must hold true for the implementation. This means that any comments about the interface must hold true for every implementation.
We were wondering if the comments needed to be on each of the concrete classes or if we could just put it on the interface, and this was confirmed for me by Ben Heimann who quickly made an interface and a concrete class. Then he commented just the interface method and not the concrete one. We of course knew we would see the comment when using the interface, but we also saw it when we were dealing with the concrete class. Great work Visual Studio 2010! This means we don’t have to duplicate and also signals that we should follow LSP.
The concern is that if you have the comment in both places you would have to update them both. This also means that they could differ, and if they ever needed to intentionally differ then it means that we are violating LSP. Having the comment in the one place should at least point to the fact that we should maintain the same behavior for the calling code in all implementations of our interfaces.
 Over a year ago, Steve Smith, Rich Henning, and I met to plan our first meeting of the Hudson Software Craftsmanship group. We decided on a format for the group, planned how we were going to organize the events, and came up with some topics to discuss for our first meeting since we didn’t expect people to arrive for the first meeting with lightning talks and discussion topics prepared. We also came up with the time for the meeting which would be the third Wednesday of each month, and we set up the first meeting of the group.
Since that point we have been very impressed with the core group of members who have stepped up to take part in the group and really help improve their own and others’ craft. We put on a local Software Engineering 101 event in Cleveland where four HudsonSC members, @ardalis, @brendoneus, @kevinkuebler, and @ropog, took the time to discuss some topics and run the group in exercising their skills. The class was a great success and I, as a member of HudsonSC was proud to be a part of it.
The group is always looking for new members, so if you’re in the Northeast Ohio area, please drive to Hudson, Ohio once a month on the third Wednesday of the month. We prefer if you sign up, but you can just show up and we will not turn you away. Everyone is welcome.
Sign up for the August 2010 event now!
Look for more information on the group on the Hudson Software Craftsmanship site.
Fresh opinions, ideas, and technology are always welcome.
Thank you for a great year, HudsonSC!


