I recently installed an interesting custom tool. It is an Extended version of the resource generator in Visual Studio. The nicest part of this for me is that this one is public instead of internal like the default one. In order to have a centralized resource file it needs to be usable between projects in Visual Studio, but the internal class made this difficult. I could just manually update the generated code each time after using the file, but that would just be stupid.
This is a great answer to the problem I needed to solve because it allows me to keep the resource file in one spot and not have to do and weird tricks to accomplish my goals.
The article accompanying this tool is well-written and explains a bit about how to use and install it.
This little tool is easy to install. It comes with an MSI installer or the source code whichever you prefer. I'd say just go with the MSI.
Note: Make sure if you are on Vista you run it as administrator though or it will not work. Since it is an MSI file you will not see an option to run as administrator, so you will want to create a batch file to do this. In the batch file you will execute the MSI file. You will run the batch file as administrator. The following code should be in the batch file.
msiexec /i "Absolute path to the installer \ResXFileCodeGeneratorEx.msi"
That should get it installed. You then need to create a resource file and in the "Custom Tool" field of the properties window type "ResXFileCodeGeneratorEx" into the field. This will then make your new generated Strongly Typed resources a public class.
Congratulations you may now use your resource file between projects!
Introduction
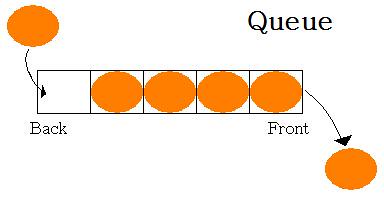
The Queue is a very important and common Data Structure in Computer Science. As the name queue suggests, this data structure can be described with an analogy of waiting in a line. There is no cutting allowed in the line, so the first person in the line is the first person out of the line. With the data structure it is the same way First In First Out (FIFO).
The best way of managing the data in a queue in my opinion is by storing the data in a "circle" by this I mean that when we reach the end of the contiguous data if we have room at the beginning we can start filling in there. This data is stored kind of like a snake going through a circular pathway. The snake will grow and shrink as it travels along this path.
Methods of a Queue
There are only two functions which are required with a queue. One will insert data into the queue and one will remove data from the queue. (One to grow the snake and one to shrink the snake) We call these two functions Enqueue and Dequeue.
- Enqueue is our method for adding new items to the queue. It will add the new items to the back of the queue.
- Dequeue is our method for removing items from the queue. It will remove items from the front of the queue.
Since I like my collections to not be limited in size, we will also have a private function for increasing the size of the queue if we run out of space and need to add another element.
Common Implementations
Generally a queue will be an array and it will have a pointer to the front of the queue and a pointer to the end of the queue. As new items are added and removed the pointers will adjust themselves. The pointer to the end of the queue is the pointer to the location where the next element will be placed into the queue, and the pointer to the front of the queue is the location of the next element which will come out of the queue.
In my example I have simplified this a little bit by not using pointers. I'll just be using a FrontIndex and a BackIndex which are just integers telling me which index to use for my array.
Simple Sample C# Implementation
As I like doing, this queue will be a Generic queue, so this is how it will be defined.
public class Queue<T>
{
}
With the class defined, I'll start by adding the following properties.
#region Properties
/// <summary>
/// The capacity of the Elements Collection
/// </summary>
private int _capacity;
public int Capacity
{
get { return _capacity; }
set { _capacity = value; }
}
/// <summary>
/// The number of elements currently in the queue.
/// </summary>
private int _length;
public int Length
{
get { return _length; }
set { _length = value; }
}
/// <summary>
/// The actual data elements stored in the queue.
/// </summary>
private T[] _elements;
protected T[] Elements
{
get { return _elements; }
set { _elements = value; }
}
/// <summary>
/// This is the index where we will dequeue.
/// </summary>
private int _frontIndex;
public int FrontIndex
{
get { return _frontIndex; }
set { _frontIndex = value; }
}
/// <summary>
/// This is the index where we will next enqueue a value.
/// It is calculated based on the Front Index, Length, and Capacity
/// </summary>
public int BackIndex
{
get { return (FrontIndex + Length) % Capacity; }
}
#endregion
Once I have these properties in place I'll add my basic constructors; one which takes no parameters and one which takes a capacity.
#region Constructors
public Queue()
{
Elements = new T[Capacity];
}
public Queue(int capacity)
{
Capacity = capacity;
Elements = new T[Capacity];
}
#endregion
Now that I am able to create the queue, it is time to start adding the functionality. As I've mentioned, we need to have enqueue, dequeue, and the private method IncreaseCapacity.
With Enqueue I'll have it take in an element and then check to see if we have space. If we don't I'll increase the capacity, and if we do I'll add the element at the back index and increment the length. Since we are calculating BackIndex based on the FrontIndex and the length we don't have to manually adjust it.
Dequeue will make sure we are not empty and if we are it will throw an error. We then want to pull the next element out of the front of the queue and adjust our length accordingly. We also want to increment our FrontIndex. Notice that we increment it by 1 and mod it by the Capacity. This gives us the remainder of FrontIndex + 1 / Capacity. This gives us our circular storage. It makes it so when we read the end of the array we start back at the beginning.
#region public methods
public void Enqueue(T element)
{
if (this.Length == Capacity)
{
IncreaseCapacity();
}
Elements[BackIndex] = element;
Length++;
}
public T Dequeue()
{
if (this.Length < 1)
{
throw new InvalidOperationException("Queue is empty");
}
T element = Elements[FrontIndex];
Elements[FrontIndex] = default(T);
Length--;
FrontIndex = (FrontIndex + 1) % Capacity;
return element;
}
#endregion
Increasing the capacity is not very difficult. In this example I am going to add 1 and double the capacity when it needs to be increased. I like the idea of hitting a reset button on the queue every time we increase size, so I'll create a new queue and enqueue into it every element from the current queue using the dequeue method to empty the current one. I'll then assign all of the properties of the new queue to the current one and I am done.
#region protected methods
protected void IncreaseCapacity()
{
this.Capacity++;
this.Capacity *= 2;
Queue<T> tempQueue = new Queue<T>(this.Capacity);
while (this.Length > 0)
{
tempQueue.Enqueue(this.Dequeue());
}
this.Elements = tempQueue.Elements;
this.Length = tempQueue.Length;
this.FrontIndex = tempQueue.FrontIndex;
}
#endregion
With this function we should now have a working Queue structure. To test it we can run it through some quick little for loops.
Queue<int> myQueue = new Queue<int>();
for (int i = 0; i < 50; i++)
{
Console.WriteLine("Enqueue: " + i);
myQueue.Enqueue(i);
Console.WriteLine("New Length is: " + myQueue.Length);
}
for (int i = 0; i < 50; i++)
{
Console.WriteLine("Dequeue: " + myQueue.Dequeue());
Console.WriteLine("New Length is: " + myQueue.Length);
}
for (int i = 0; i < 50; i++)
{
Console.WriteLine("Enqueue: " + i);
myQueue.Enqueue(i);
Console.WriteLine("New Length is: " + myQueue.Length);
}
for (int i = 0; i < 50; i++)
{
Console.WriteLine("Dequeue: " + myQueue.Dequeue());
Console.WriteLine("New Length is: " + myQueue.Length);
}
try
{
myQueue.Dequeue();
}
catch (InvalidOperationException ex)
{
Console.WriteLine("As expected I received this error: " + ex.Message);
}
Once we run that and see that it works we know that we probably have a Queue that works pretty well.
Once again here is the entire Queue Class.
public class Queue<T>
{
#region Properties
/// <summary>
/// The capacity of the Elements Collection
/// </summary>
private int _capacity;
public int Capacity
{
get { return _capacity; }
set { _capacity = value; }
}
/// <summary>
/// The number of elements currently in the queue.
/// </summary>
private int _length;
public int Length
{
get { return _length; }
set { _length = value; }
}
/// <summary>
/// The actual data elements stored in the queue.
/// </summary>
private T[] _elements;
protected T[] Elements
{
get { return _elements; }
set { _elements = value; }
}
/// <summary>
/// This is the index where we will dequeue.
/// </summary>
private int _frontIndex;
public int FrontIndex
{
get { return _frontIndex; }
set { _frontIndex = value; }
}
/// <summary>
/// This is the index where we will next enqueue a value.
/// It is calculated based on the Front Index, Length, and Capacity
/// </summary>
public int BackIndex
{
get { return (FrontIndex + Length) % Capacity; }
}
#endregion
#region Constructors
public Queue()
{
Elements = new T[Capacity];
}
public Queue(int capacity)
{
Capacity = capacity;
Elements = new T[Capacity];
}
#endregion
#region public methods
public void Enqueue(T element)
{
if (this.Length == Capacity)
{
IncreaseCapacity();
}
Elements[BackIndex] = element;
Length++;
}
public T Dequeue()
{
if (this.Length < 1)
{
throw new InvalidOperationException("Queue is empty");
}
T element = Elements[FrontIndex];
Elements[FrontIndex] = default(T);
Length--;
FrontIndex = (FrontIndex + 1) % Capacity;
return element;
}
#endregion
#region protected methods
protected void IncreaseCapacity()
{
this.Capacity++;
this.Capacity *= 2;
Queue<T> tempQueue = new Queue<T>(this.Capacity);
while (this.Length > 0)
{
tempQueue.Enqueue(this.Dequeue());
}
this.Elements = tempQueue.Elements;
this.Length = tempQueue.Length;
this.FrontIndex = tempQueue.FrontIndex;
}
#endregion
}
Happy Data Structure Building!
I recently wrote some SQL which would do some work for a single day, but I wanted my code to be able to run once for each day in a date range. Luckily for me, I read Gregg Stark's SQL Blog. He recently posted about how to Iterate Over a List of Dates using a Numbers table in SQL. The SQL he gives is pretty much a cookie cutter solution to the problem.
The basic idea of this trick is to have a cursor which is going to allow you to fetch each of the dates into a variable for use in your code.
You first need to have a Numbers table in your database. This is basically just a table which contains a single number for each row. Use the following short snippet to create your Numbers table.
CREATE TABLE dbo.Numbers
(
Number int IDENTITY(1, 1) PRIMARY KEY
)
GO
declare @MaxNumber int
set @MaxNumber = 65535
WHILE 1 = 1
BEGIN
INSERT INTO dbo.Numbers DEFAULT VALUES
IF scope_identity() = @MaxNumber
BEGIN
BREAK
END
END
GO
Once you have this numbers table you can follow this cookie cutter solution Gregg created which is actually a very nicely written solution to the problem.
Declare @StartDate datetime
Declare @EndDate datetime
-- Note: This StartDate is Exclusive and this EndDate is Inclusive
set @StartDate = '10/1/2007'
set @EndDate = '10/9/2007'
declare @CurrentDate datetime
-- Create the cursor with the dates using the numbers table
declare datecursor cursor forward_only
for Select dateadd(d,Number,@StartDate) from Numbers
where Number <= datediff(d, @StartDate, @EndDate)
order by Number
open datecursor
-- Loop which will exit when we are out of dates to check
while (1=1)
begin
fetch next from datecursor into @CurrentDate
if @@fetch_status <> 0
break;
-- This is the code which will run for each date
select * from some_table where DateRecorded = @CurrentDate
end
-- Cursor Cleanup
close datecursor
deallocate datecursor
Happy SQL writing!
I've just written a quick little stack implementation for use in explaining the stack data structure. It is written in C# and is not exactly a robust solution, but it works well enough. It is stubbed out with the basics of what is required to have a working stack. If you don't know how a Stack works, I also recommend reading my Simple Explanation of the Stack Data Structure.
For the heck of it, since I love Generics, I decided to make this a Generic Stack. The first step is to create the Generic class definition. To make it Generic we will add <T> into the name of the class.
public class Stack<T>
{
}
Once we have this class we will want to give it some properties. The properties I am going to use for this implementation are; Capacity to hold the amount of space reserved for the Stack, Length to let us know how many elements are currently in our stack, Elements to actually contain our elements, and Index to keep track of which element is currently on the top of the stack.
#region Properties
private int _capacity;
public int Capacity
{
get { return _capacity; }
set { _capacity = value; }
}
public int Length
{
get { return Index + 1; }
}
private T[] _elements;
protected T[] Elements
{
get { return _elements; }
set { _elements = value; }
}
private int _index = -1;
public int Index
{
get { return _index; }
set { _index = value; }
}
#endregion
We have initialized Index to -1 and Length is always Index + 1, so right now Length is 0. Notice that Elements is an array of T elements. When someone instantiates this stack class T will be defined as some type.
In our constructor we will want to initialize Elements to be an empty array for us to store out data. For this simple example I have two constructors. One of them takes 0 parameters and creates an empty array, and the other constructors takes an initial capacity for the array.
public Stack()
{
Elements = new T[Capacity];
}
public Stack(int capacity)
{
Capacity = capacity;
Elements = new T[Capacity];
}
Next we need to create the basic functions to perform the operations we require with a stack. The first operation needed is a way to add data to the stack. We do this using the Push method. Push will take an element of type T, and it will push it onto our stack. If we are out of space on our stack, Push will need to create more space for us, so we will also create a method for increasing out capacity. To get data out of the stack we will need a Pop method. This method will remove the top element from the stack and return it to us. It should throw an error if the stack is empty. Sometimes it is needed in a stack to be able to check the top element without removing it. I will call this method peek. This could have been achieved by calling myStack.Push(myStack.Pop()), but I think it is much cleaner to just create this simple method.
public void Push(T element)
{
if (this.Length == Capacity)
{
IncreaseCapacity();
}
Index++;
Elements[Index] = element;
}
public T Pop()
{
if (this.Length < 1)
{
throw new InvalidOperationException("Stack is empty");
}
T element = Elements[Index];
Elements[Index] = default(T);
Index--;
return element;
}
public T Peek()
{
if (this.Length < 1)
{
throw new InvalidOperationException("Stack is empty");
}
return Elements[Index];
}
private void IncreaseCapacity()
{
Capacity++;
Capacity *= 2;
T[] newElements = new T[Capacity];
Array.Copy(Elements, newElements, Elements.Length);
Elements = newElements;
}
At this point we now have a working stack. We can push, pop, and peek. So now we write a tiny little command line program to test out our stack. I'll use some for loops to throw some data into the stack and use for loops to peek at the data and pop it off. I'll then make sure I can get my stack empty errors.
class Program
{
static void Main(string[] args)
{
Stack<int> myStack = new Stack<int>();
for (int i = 0; i < 50; i++)
{
Console.WriteLine("Pushing: " + i);
myStack.Push(i);
Console.WriteLine("New Length is: " + myStack.Length);
}
for (int i = 0; i < 50; i++)
{
Console.WriteLine("Peeking First: " + myStack.Peek());
Console.WriteLine("Popping: " + myStack.Pop());
Console.WriteLine("New Length is: " + myStack.Length);
}
try
{
myStack.Peek();
}
catch (InvalidOperationException ex)
{
Console.WriteLine("As expected I received this error: " + ex.Message);
}
try
{
myStack.Pop();
}
catch (InvalidOperationException ex)
{
Console.WriteLine("As expected I received this error: " + ex.Message);
}
Console.WriteLine("Press the enter key to exit");
Console.ReadLine();
}
}
As I said, this is not the most robust and best written stack ever. It isn't designed to be, but it explains the basics of how a stack works. I hope you've enjoyed this. Happy Generic Stack writing.
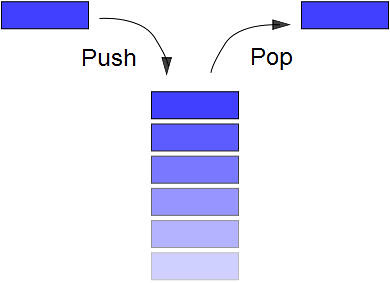
I found myself recently explaining a few times how the data structure commonly called a stack works. The technical term for a stack would be a Last in First out Data Structure (LIFO). To practically repeat myself, this means that the last object to go into the structure is the first one which will come out of the structure.
I've heard plenty of interesting analogies for this behavior. All too often I hear this being described as a stack of plates. Plates can be added easily onto the top of the stack, and can be removed from the top of the stack easily. Working with any plates not on the top is difficult because there are other plates on top of them. This is basically how a stack works.
While explaining the push() and pop() methods of stacks, I came up with an analogy which I think is far more interesting. To my students I described the stack as a Pez dispenser. You load the dispenser from the top and unload it from the top.
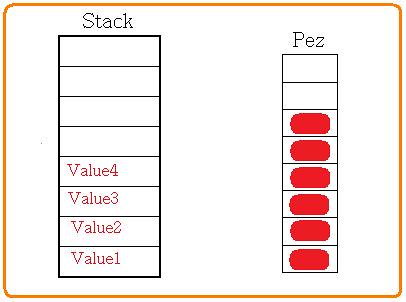
When you get a candy from the dispenser it comes out of the top and you now have possession of it. With a stack you get the value from the top and you now have possession of it. When adding candy to the dispenser you will add it on top of any existing candy. With a stack you will add new values on top of the existing values.
One extra method available to a Stack is the ability to "peek" at the top value without removing it. This is often necessary when using a stack, and also in a Pez dispenser. When you lift the head of the dispenser a little bit you can peek in to check what color is on top. If it is not one you like, you can still close the dispenser without having removed the candy. The same can be done with a stack.
Basic Implementation
Stacks may be implemented easily with an array or a linked-list as the underlying data structures. When drawing a stack it is far more common to draw the array version. There is one pointer of importance with a stack. This pointer is usually called the "top" pointer. It is a pointer which updates every time a "push" or a "pop" occurs, because this pointer will always point to the top of the stack. This is the pointer used to get to the stack and work with it.
The Push and Pop Operations work as the following image shows.
Enjoy, and look forward to more blog posts explaining interesting Computer Science topics.